Difference between revisions of "Getting started with Yantrr Device Cloud"
(→Device Registration) |
|||
| Line 34: | Line 34: | ||
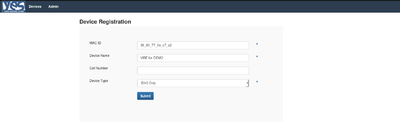
[[File:deviceReg.png| center|thumb|400px | Device Registration ]] | [[File:deviceReg.png| center|thumb|400px | Device Registration ]] | ||
On successful device registration user is redirected to Devices List page where some of demo devices provided by Yantrr and user registered device is listed. | On successful device registration user is redirected to Devices List page where some of demo devices provided by Yantrr and user registered device is listed. | ||
| + | |||
| + | == Run Yantrr Device Client == | ||
== Devices List == | == Devices List == | ||
Revision as of 05:48, 30 December 2015
Contents
[hide]Overview
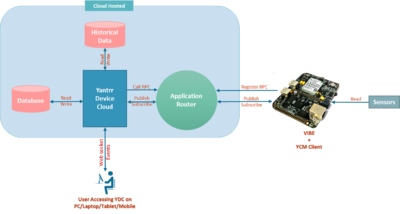
Yantrr Device Cloud (YDC) is cloud based software that provides complete management and reporting for your registered Yantrr device. You can access features like Device status, positioning, control, and access its data from any browser.
Getting Started
- You will have to create a user account on the YDC, if you don't already have one. Click on the “Register Now” button, and fill in the required fields. An email with the verification link is sent and clicking on this completes your Registration process.
- Once logged in, please register your device(s) using the "Register New Device" link
- The Device dashboard, is the view where all the registered Yantrr devices like the VIBE or Beaglebone Black with Vayu Capes running YCM client will be displayed.
- If you are accessing the YDC demo site, the site will be presented in read only mode and the user can browse some of the Yantrr Demo Devices. Some of the functionality like Registering device and Admin tab will be disabled in this demo mode.
- Please click on the "Devices" tab to get started.
Device Registration
- Step 1 : Note down the Ethernet MAC ID of your device
#ifconfig eth0
eth0      Link encap:Ethernet  HWaddr 38:60:77:2e:c7:a2
          inet addr:192.168.1.150  Bcast:192.168.1.255  Mask:255.255.255.0
          inet6 addr: fe80::3a60:77ff:fe2e:c7a2/64 Scope:Link
          UP BROADCAST RUNNING MULTICAST  MTU:1500  Metric:1
          RX packets:96953 errors:0 dropped:284 overruns:0 frame:0
          TX packets:61474 errors:0 dropped:0 overruns:0 carrier:0
          collisions:0 txqueuelen:1000
          RX bytes:91913079 (91.9 MB)  TX bytes:6508982 (6.5 MB)
          Interrupt:40
Here 38:60:77:2e:c7:a2 is the ethernet MAC ID of your device.
- Step 2 : Fill the device details in device registration form
- Login to Yantrr Device Cloud
- Click on "Register New Device" button
- Submit the details of your device
Note: In MAC ID field you have to type _ (underscore) instead of : (colon). Like in this case, for Ethernet MAC ID 38:60:77:2e:c7:a2 you have to type 38_60_77_2e_c7_a2.
On successful device registration user is redirected to Devices List page where some of demo devices provided by Yantrr and user registered device is listed.
Run Yantrr Device Client
Devices List
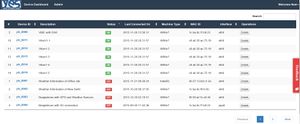
Here a list of devices and their current status are displayed
- The Device ID generated for your registered device
- The Device description entered at the time of registration
- The current status of communication of the device with YDC
- Last connected status
- Mac ID of the device
- Some supported operations on the device (Disabled for demo use)
Device Dashboard
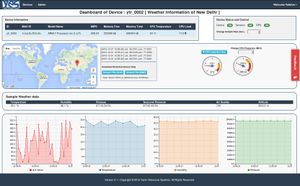
To access individual device’s dashboard click on the Device ID.
Sections on Device Dashboard Page
- Device Information
The device details with its MAC ID, MIPS (CPU Frequency), Memory Information (RAM), Current CPU Temperature, Current CPU Load are displayed here.
Also, its shows the realtime status of Memory Free, CPU Temperature, CPU Load, etc. - Device Status and Control
The current status of Device, the Sensors attached to it as well as GPS status is displayed here. Also you can change the sample rate at which the data to be published to server from current device. - Real Time Device GPS Location
The location of the Yantrr device can be visualized on the map in real time. The current GPS location is displayed with timestamp in text format. - Historical Device Data Access
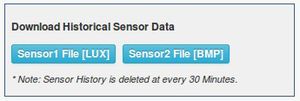
This section gives capability to user such that he/she can download historical data of sensors attached to device. Currently the devices which are provided in this demo has LUX and BMP sensors attached to it. - Monitoring Device CPU Load and CPU Frequency
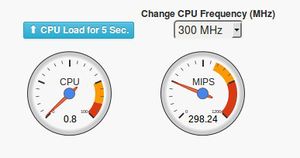
In this section the user can monitor the current CPU load and frequency of device. Also user can increase the CPU load or change CPU frequency. - Sample Weather Data from Device
This section displays the random sample weather data in real time. - Real Time Sensor Data from Device
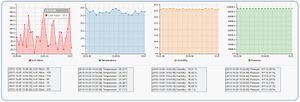
The sensor data of attached LUX and BMP sensors are shown in real time graphs.
